Showing posts with label Abakhan. Show all posts

Friday, 30 December 2016

I Made a Dress For Absolutely No Reason

* Disclaimer - this is a re-post of an older post that was completely messed up graphics wise. So apologies if you've seen this before!

Hello! Long time no see. I've been a bit lazy about blogging because of the quick hit provided but Instagram and the like. With blogging, it feels like I have to have a long involved background story to each project when sometimes I just don't.

So I'm not going to lie - I made this dress just because I felt like it. I didn't need it, it was probably a bit too late in the summer for it - but who cares! This was the pattern:   


Butterick 5281 from 1946
I made view B in a Robert Kauffman quilting cotton which I picked up a few months ago in Manchester. And here it is:


I made this dress once before here, and even though I really like it, I was a little uncomfortable with the fit. I jigged around with the pattern again, and the result is a much better fitting dress.


It's kind of hard to see in this busy pattern, but the bodice has some asymmetrical draping with pleats at the right shoulder, and gathering on the left side seam.


With this version, I also made the effort to make a matching belt, using a little clasp from I found years ago in a charity shop:


I'm late posting about this dress - it was finished about 6 weeks ago - but the re-vamped fit has made it so comfortable that I wore it nearly every week until it got cold.


And that's it - see you soon!


Sunday, 23 October 2016

I Made a Dress for Absolutely No Reason

Hello! Long time no see. I've been a bit lazy about blogging because of the quick hit provided but Instagram and the like. With blogging, it feels like I have to have a long involved background story to each project when sometimes I just don't.

So I'm not going to lie - I made this dress just because I felt like it. I didn't need it, it was probably a bit too late in the summer for it - but who cares! This was the pattern:   

Butterick 5281 from 1946
I made view B in a Robert Kauffman quilting cotton which I picked up a few months ago in Manchester. And here it is:


I made this dress once before here, and even though I really like it, I was a little uncomfortable with the fit. I jigged around with the pattern again, and the result is a much better fitting dress.


It's kind of hard to see in this busy pattern, but the bodice has some asymmetrical draping with pleats at the right shoulder, and gathering on the left side seam.


With this version, I also made the effort to make a matching belt, using a little clasp from I found years ago in a charity shop:


I'm late posting about this dress - it was finished about 6 weeks ago - but the re-vamped fit has made it so comfortable that I wore it nearly every week until it got cold.


And that's it - see you soon!


Monday, 8 February 2016

Caped Capers!

I'm on a mission to reduce the mountain of fabric I currently have, though with each piece of stash used I inevitably have to buy more to supplement whatever it is I'm making, be it lining, contrast trim, and so on. Baby steps, I suppose.

In a bid to start, I dug out some lovely tartan wool from Abakhans, which I've had for at least 5 years:


I considered a skirt at first, but I really wanted a cape or jacket or something along those lines. This was partly inspired by the cape I made for Mr Needles  which I drafted myself. It was so easy, I decided to give it a go.

I started by making a muslin which looked like this:


This was just the basic cape shape, with no provision for arms or anything. I didn't really want this sort of thing, so after playing around for a bit I settled on the shape below, which is somewhere in between a jacket and a cape:


I made a few adjustments to the shoulder shape, the length, added a hood pattern and drafted facings, then started cutting out. I quickly realized that the fabric wasn't going to be heavy enough on its own, so I decided to interline it with some black cotton sheeting. In order to keep it in place while I was working with it, I tacked the cotton pieces to the outer fabric along the lines of the tartan, as you'll see below. The tacking was then removed once the pieces were all sewn together:

Wrong side of hood piece with interlining and tacking

Right side of hood piece with tacking

I did this with all the main pieces, before applying the interfacing which I attached by hand - forgot to take photos of this step, unfortunately! 

I like my projects, especially coats and jackets, to have weight to them; once I machined it all together, it still didn't feel quite weighty enough. I decided to abandon my original lining, a shiny poly, and considered other heavier options, like quilting. I couldn't find any I liked; then after a stroll along Walthamstow market I happened on some black fleece - problem solved!

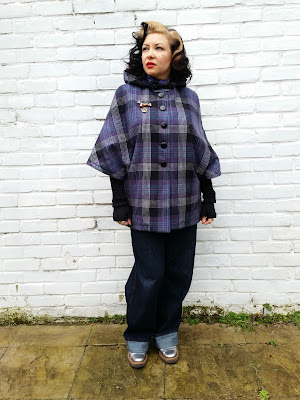
And here it is all finished up!:


I only had 2 metres of the tartan; if I'm honest, 2.5 or 3m would have been ideal to match all of the seams. But I just decided that some seams would match, some would 'half-match', and others wouldn't match at all. And you can always cut some bits on the bias and thus avoid matching altogether!

There's no back seam, so no matching needed there!


I made extra matchy efforts with the front:


And the hood, which was cut on the bias, got extra attention on the seam:


But the side seam got what I call 'half-matching' - I matched the horizontal lines, but not exactly to the right parts of the tartan - you'll see what I mean below:

Close up of the side seam - sort of matched...
But the shoulder seams - forget it! I've got better things to do:
Not really matched shoulders. Oh well...
Because I thought the front was looking a bit plain, I added a little tab at the last minute for some interest, and to pull the hood in around the neck:


Here's a picture of the linings and facings. The fleece was such a good choice - despite the big drafty sleeves, the jacket is really warm!:


One last thing - I love the simple silhouette of the jacket/cape, but it does have a rather limiting effect on the movement of your arms. Reaching up high for anything does mean the whole jacket lifts up with your arms; not a big problem, but for that reason I stopped the buttons at the waist:


And I think that's it. I leave you with a picture of me looking rather goofy with the hood up:


See you soon!


Outfit details:
Jacket - homemade, tartan wool from Abakhan, fleece lining from Walthamstow market
Shoes - Dries Van Noten
Gloves - knitted by me!
Brooches - Russian Dolls from Budapest, Spanish Galleon from charity shop

Tuesday, 3 March 2015

A Bit of Winter Sparkle

Hello there! I'm behind with my blogging and have several things to show you guys, so expect a flurry of posts in the next few weeks. To start - I made a coat! As usual there's a bit of a story behind it. I bought this coat about 10 years ago:


It's by a brand called Libertine, who at the time specialised in customizing high end vintage clothes with graphics. It was hugely expensive, but I managed to get a massive discount, and proceeded to wear it to death as it was SO WARM!!!! There were no labels inside - naughty Libertiner-s took them out and replaced them with their own - but I assume it was a cashmere or cashmere mix. It's also hard to determine the era of the coat without the labels; looking at the construction techniques, it could be from any era between the late 60's to the 80's. 

The coat appears simple, but there is some interesting sleeve. armhole, and yoke construction:


Back armhole and sleeve detail
Besides the name on the back, there's also some symbols on the sleeve cuffs:


But as you can probably see in the photos, the coat has seen better days - it's threadbare all over the place, some of the buttonholes are frayed, and I won't show you the lining because it's disgracefully worn out. But I've hung on to it for years because it was an investment and I can't bear to part with it, even though it's pretty unwearable. So I've kept it's memory going by remaking it. Here's the pattern which I made through a combination of measuring and tracing - it looks weird:


The pattern - that's the sleeve on the top right

I was considering taking the coat apart and using the pieces as my pattern, but I just couldn't bring myself to do it - am I the only one sentimental about clothes this way?

I used a sparkly wool that I picked up last summer on a flying visit to Abakhan's in Manchester:


It has a sort of boucle texture with random bits of silver sprinkled throughout. And it frays like crazy when you work with it, so pinking shears were used for most seams. 

And here it is:


I have been wearing this constantly since I made it - it's so warm and comfortable! I didn't quite manage to transfer all of the fullness of the original to my version, but I think it still retains the shape of the original. I lost the front button band - never liked that bit - and added that to the front section. I also made it a good 5 "/12.5 cm approx off the length.


I totally forgot to take any construction photos as I went along, but I used iron-on hair canvas for the interfacing on the front, yoke, and collar. Because I'm a bit 'belt and braces' in general, I trimmed away the seam allowances of all the interfacing pieces to reduce bulk in the seams, and then herringbone stitched the interfacing to the coat pieces. I also placed 3" bias strips in the hem for weight and 'crispness'. Then I turned up the coat hem, and herringbone stitched it to the interfacing before inserting the lining. 

The coat goes together pretty quickly - it's just a series of rectangles, no tricky round sleeves, etc. The only tricky bit is the junction of the sleeve seams under the arm. It took a couple of goes, but I got there in the end!:


Hard to see, but this is what the seams look like under the arms
I was considering interlining the coat for warmth, but then decided it didn't need it. Instead, I used a heavy-ish satin that I found in  local shop in Dalston for a bargain £3 per metre. I don't think it's meant for lining (it seems to have some stretch in it) but I don't care because I like it!


I cut the lining using the same pattern pieces, but with the facings and collar accounted for. It was put together on the machine, but then applied to the coat by hand:


Where the lining meets the coat - you can see my little hand stitches


Where the lining meets the centre back facing, with a pleat for ease of movement.
I topstitched around the centre front collar and yoke, just like the original. I also avoided button holes by using big black press studs:


Top stitching and press stud detail


I made the cuffs a bit deeper than the original:


I think that's everything! As I said earlier, I've worn this coat constantly in this cold weather, and it's kept me warm and toasty. You can throw it on with anything, jeans and a t-shirt or something fancier. I'm actually going to miss wearing it once it gets warm!

See you soon!


Monday, 13 May 2013

The Sushi Chef Shirt

First, a big 'thank-you!' to Clare at Sew Dixie Lou and Emma at My Oh Sew Vintage Life for giving me a Liebster award - a response post to follow soon!

 I'm very lucky in that Mr Needles loves cooking; most evenings I come home to a new feast, often inspired by south east Asian cuisine, interspersed with quite a few good burgers. He spends hours watching testosterone fuelled cooking programs, usually involving fire, knives, and shouting, then goes crazy in the kitchen chopping, marinading, and generally cooking up a storm!

It was one of these programs that inspired him to ask for sushi chef-inspired shirt. On a recent trip to Abakhans in Manchester, he even joined in with the rummaging and found an Alexander Henry offcut which was a bit Japanese-y. (I could see I wasn't getting out of this...) I traced a pattern based on one of his favourite shirts, added in some plain black cotton poplin,  and behold - the sushi chef shirt!

A serious chef always uses the proper equipment.


Mr Needles insisted on a matching headband
As I said before, the fabric was a piece of Alexander Henry off-cut, and as luck would have it the name of this pattern is 'Yoko':


-which inspired Mr Needles to sing some Plastic Ono Band tunes:


Some details-

I used an old shirt of Mr. Needles' to make the pattern. Because I'm essentially a total cheapskate, I used the back of old Christmas wrapping paper to make the pattern.

Tracing the collar from the original shirt

There wasn't enough fabric to make the whole shirt in the patterned fabric so I cut the collar and back panel out of plain black poplin:

The contrast collar...

...and the plain black back section
I also trimmed the sleeves in the plain black, and added some trim to the front pocket:


And that's that! Mr Needles loves his new shirt, and hopefully I'll benefit from it with some good eatin'


 See you soon!