Showing posts with label Bias. Show all posts

Thursday, 27 June 2013

A Change of Decade - the 30's Bias Dress

I think I'm like many people in that my understanding of times gone by, especially fashions and interiors, comes from old movies. Therefore the first thing that springs to mind when I think of the 1930's is images such as this:

Jean Harlow in a bias cut gown (Source)


Fred Astaire and Ginger Rogers (Source)
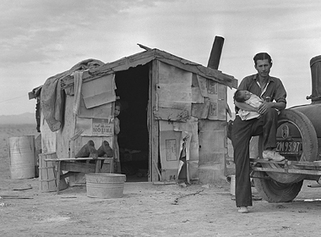
And why were the films and the stars of this era so glamourous? Because for a lot of the population, especially in America, life was more like this:

(Source)
(Source)
 
1930's Soup kitchen for the unemployed (Source)
A combination of massive economic collapse and the dustbowl of Mid West America, where most of the topsoil literally blew away, thereby making it impossible to grow anything, resulted in what we now refer to as the Great Depression. What followed was mass unemployment and large migrations of the population to find work, especially to California, which is exactly what my mother's family did when they moved from San Antonio, Texas to San Francisco.

It's understandable that movies of the time would provide an alternative to the troubles of daily life with glitz and glamour. Everything was shiny, from the floors of the ballrooms to the satin gowns that were usually draped around the ladies. Characters had housemaids and servants, and usually had nothing more to worry about than who they would bump into on the cruiseship to Europe.

Why the mini history lesson? Well, all of this was going through my mind when I decided to make the Sew Vera Venus Little Bias Dress:


This is a great pattern for a slinky, satin-y 1930's dress. But I didn't think I would have as much use for a satin dress, so I re-imagined it as something more everyday, with a touch of the mid-west.

I found this lovely cotton fabric at Goldhawk Rd on the recent Spring London blogger meet-up, and decided it was perfect for what I had in mind:


And here it is:


I was a grown-up and actually made a muslin for this dress (see this post); once I made some fitting adjustments, the dress went together really easily. Since most of it is cut on the bias I figured it would be a pain to put a lining in - trying to get the drape of the lining and the dress to match up would have been really difficult. (I'm not used to dresses being unlined, so I just wore a half slip which was just fine) To keep the insides neat and tidy, I used French seams throughout; to neaten the skirt frill and the armhole, I bound it with self-made bias binding:

Seam neatened with bias binding
I seem to remember that dresses of this era often didn't have zip closures, and used button plackets instead. So that's what I did!:


I even managed to find little mother of pearl buttons that matched the flowers in the fabric!

A few more details:

Back waist
There's a little belt at the back that I didn't really know what to do with, so I tied it in a neat knot. And instead if darts, the bodice gathers into the waist, making it softer and more comfortable to wear.


For some reason the frilly-ness of the sleeves doesn't really come across well in the photos, so you'll just have to believe me that they are super floaty and probably my favourite part of the dress.

The dress has a really summery, holiday feel to it - shame we don't have the weather to match here in London at the moment. But being inappropriately dressed has never stopped me from wearing a new outfit!

See you soon!

Tuesday, 11 June 2013

Fun with Bias - the Alexander Wang Skirt Makeover

I've mentioned before that I work in a hoity-toity department store full of designer goods. I'm a really bad advert for the stuff I sell because most days my outfits are at least 50% home made, but now and then I find something I deem worth spending my hard earned pennies on.

During the sale last Christmas, I found this skirt from T by Alexander Wang:

Morticia Adams?


It's a rayon velvet, floor length skirt. It's usual price was about £200, but I think because of the length, they proved to be pretty unpopular so they were being sold for £10. I snapped one up! I was never going to wear a skirt this length - a bit Goth for me - but at the very least I thought the fabric alone was worth the price.


So I took it home, put it in a pile of 'future projects', and forgot about it for 5 months.

Until a couple of weeks ago, when I had the urge to make something quick. I decided to shorten the skirt, but also to add an insert to the center back seam to give it a swingy feel when you walk. Sounds easy!

But the bias construction did everything it could to slow me down. For anyone not aware, bias is the diagonal of the fabric. It gives a natural stretch to the fabric, making it great for draping and flowing around curves. But it also means the fabric moves and slips when working with it, so you have to be especially careful when handling it.

The first thing I tackled was the length. With a skirt cut on the straight of grain, I would just estimate how much I want to take off, measure that from the hem up, then slice off. But with a bias construction, the fabric conspires against you, moving and stretching and slipping all over the place, making measuring a pointless exercise. I looked at books, I consulted the web, I even had some advice from the lovely Clare at Sew Dixie Lou, but in the end I came up with my own method involving a doorframe, a clip hanger, and some sticky tape:


I clipped the skirt firmly in place, hung it from a doorframe, then measured from the top down on either side of the door frame. This is where I placed my sticky tape, running across the skirt where I wanted to shorten it. Take a step back, make sure it looks level, then cut!

And it worked a treat! You'll have to take my word for it, because I forgot to take a photo. But it left me with this piece:


This was the piece which was to be used for my back seam insert. I decided to gather it up at the top and finish it with a strip of velvet at the top:


Then I unpicked the back seam, and sewed the gathered piece in place:

Inside view of the finished skirt

The hem was finished with a long strip of chiffon which I picked off the original hem and turned to the inside.

Here it is in action, swinging away on a rooftop in Kings Cross:

 
And here's the advantage of a bias cut - when at rest, the skirt is slim and slinky:


But then, when the urge takes you, huge lunges can be achieved with no effort at all:


And that's bias! See you soon!

Monday, 20 May 2013

The Totally Un-Wearable Muslin

I don't think I've ever made a muslin. I'm one of those pin and try on as you go people, making adjustments along the way. With time and experience, I've learnt what to avoid, what measurements to take prior to cutting, and also to slow down and look at things in depth rather than just going for easy or quick fixes. I often read about 'wearable muslins' - I suppose that's what I've been doing all along!

Source
 But I decided to be a grownup and make a muslin for my next project, which was the Sew Vera Venus little bias dress. Lots of reasons for this:

- large sections are cut on the bias, and I don't have a great deal of experience with cutting large pieces in this way, so some practise was called for.

- this is my first time using a pdf pattern, and though I've seen plenty of success with them and I don't doubt Vera's skills, I'm essentially a suspicious person and rarely trust anything that's free. More about that later.

- lastly, I really love this fabric and want to do it justice. I bought it from Goldhawk Rd on the recent big London meet up, a day I have great memories of, so the last thing I want is to make a dress with loads of mistakes that I'll never wear.

Cotton gingham and cherries

So here's my muslin. Be warned - it's one of those things that makes sense to me, but probably no one else!

Check out my clever mirror manoeuvres!
As you can see, I used scraps of whatever was around, namely some cotton poplin for the bodice and some lining scraps for the skirt. And I left off the bottom skirt flounce. But this has definitely been worth it. I learnt that the point of the skirt sits way too high (right on my crotch, hence the wearing of black tights in the photo) and will have to be lowered about 5 inches. The sleeve on the right wasn't flouncy enough for my liking, so I cut a fuller version which you see on the left. I was also able to practise sewing a sharp point, so I'm confident I'll have it perfect for the final run.

As for the pattern, it's great. Or it would have been if I had printed it correctly. I must have screwed up the print sizing or something, because it came out way too small for me, meaning I had to spend ages measuring and grading and slashing and taping. For example, here's the sleeve:

Sleeve frill - more sticky tape than paper
Again, because the skirt section is on the bias and dependant on the drape of the fabric, adjustments are about more than just measuring; I needed to see how the fabric would act. And so far I'm pretty pleased. A few tweaks here and there and I'm confident about cutting in to the fabric - hopefully you'll see the results soon!


Monday, 23 July 2012

Embrace the Bias!

I made this skirt to wear on a trip to Barcelona last year: 


It's a pretty straight forward style, but open it up to reveal:


All of the hems and facings are finished in a contrasting fabric. I always use a contrasting colour on the insides of my work, and extend this to the finishing of my hems. With the scraps of lining, I cut diagonal strips which are sewn on to skirt hems, sleeve hems, etc, to give a neat finish. This is when you have to embrace the bias!

So, what is bias? The 'true bias' of a fabric is 45 degrees to the selvedge (the woven edge of a fabric).

The tape measure is laid at 45 degrees - the 'true bias'


Due to the nature of woven fabric (which is made up of vertical and horizontal fibres) the diagonal has a natural stretch, as seen below:

Fabric stretched on the bias

This natural stretchi-ness means the fabric can mould around curves and any lines which aren't straight. It adds a slinkiness to outfits by clinging and draping around the body, and because of the bias, darts and seams can often be avoided. This was how the glamour of 1930's gowns was achieved:

Classic Jean Harlow - the bias cut clings around the hips and stomach without any darts, etc

Joan Crawford

Bias can also be used decoratively, especially with stripes:

Claudette Colbert in 'It Happened One Night' in bias cut blouse
I'm going to show you how to use bias in a slightly less glamorous, but very useful way - cutting bias binding (sometimes known as bias tape) to finish the insides of your garments. This will give your projects a neat and professional finish, and you'll never have to buy one of those little packets of bias binding ever again!

To be slightly less wasteful, I'm going to cut the strips on a diagonal, but not the 'true bias'. It won't matter, as there will still be a decent amount of stretch in the fabric:

Measuring tape on the diagonal of fabric

Next, cut the strips. I usually mark them out by making a chalk line, then measuring from this 4 cm or 1 1/2". Be careful not to stretch the fabric as you mark, otherwise the width won't be accurate.

Marking out diagonal strip

If you're cutting strips to face a hem, it's unlikely you'll be able to cut one strip for the whole hem. You'll need to join the strips at a diagonal in order to maintain the stretch.

2 pieces cut at an angle
Cut the 2 pieces to be joined at an angle (right sides up), then pin them together right sides facing and stitch:

Sttched together right sides facing

Wrong side, seam pressed open
Next, pin your binding to the section of you garment you want to finish, in this case the hem of a skirt. The binding is pinned right sides together to the hem and stitched:


Binding after being stitched

Then, iron the binding up and to the back of the hem:

Binding ironed up, away from the hem

Binding ironed to the back (wrong side) of the hem


Nearly done! Then I stitch thru all the layers, just under the binding.


Stitched just under the binding through all layers

Wrong side of finished binding

Finally, you can slip stitch through the binding to the body of the skirt, or top stitch, whichever you prefer.

This is my favourite way of finishing garments - it's neat and tidy, and it adds a bit of weight to a hem to help it hang better. 

Hope you all find this useful!