Showing posts with label Butterick 8571. Show all posts

Thursday, 30 June 2016

Frivolous Frills

Hello! I have tons of clothes, and really have no need to make any more except for the reason that I feel like it and enjoy it. It keeps me out of trouble! I usually see something in a film, or something pops up on Instagram that takes my fancy, or I buy some random fabric and then have to think of something to make with it. My imagination will be sparked, out come the patterns, and away we go.

It was a combination of these events that resulted in the latest dress. First, I've been really taken with all the off the shoulder styles that are around at the moment; I particularly liked the tutorial that By Hand London put together showing you how to draft your own. 

Next, I've always wanted to make this pattern from my collection:


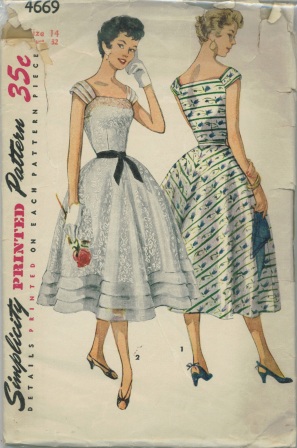
Simplicty 4669 from 1954 (image from Vintage Patterns Wiki)

I had an idea that since the straps on this bodice seem to sit on the edge of the shoulder, this would somehow work well with a ruffle or frill.

And finally, I had a big piece of this polka dot fabric in my stash:


I think I got it from Ikea many moons ago; I don't remember how much it cost, but it can't have been much!

I decided to make view 1, with the body in plain black, and with the neckline frill and some extra hem frills in the polka dot. I bought some cheap-as-chips black twill from Walthamstow market and started working on the bodice.

But as I was working on the bodice, I went off the idea of a full skirt. I often feel a bit swamped in a full skirt; I think pencil or just slightly flared suit me. 

Out came what is starting to become my old stand by, Butterick 8571:


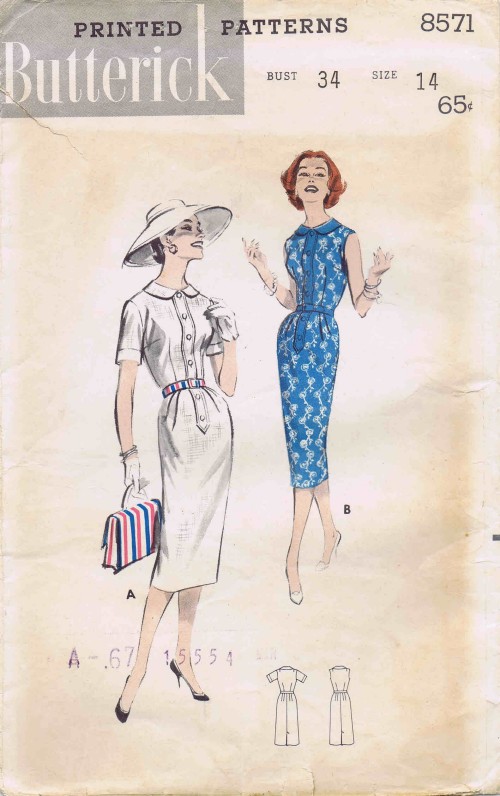
I've used this skirt here, here, and here - I find it just works for me. But I wanted to tie it in with the frill. At first I was going to add another polka dot frill at the hem - but no, just too much. I decided to draft some pockets with flaps at the hip to tie it all together:


Everybody loves pockets, right?

Close up of the left hand pocket, with the hand picked zip

Excuse the rubbish bathroom selfie, but the dress is actually quite nice in this plain version - maybe a future project?:


But now the frill! The obvious course to take would be to cut a rectangle that was the required depth (plus hems), and was the measurement of the neckline and shoulders times 1 1/2. That method is fine, but I find that can make for a rather boxy frill. Instead I cut the frill as a circular piece, then gathered it to drape across the neckline and around the shoulders:


Completed frill

This way the frill has a flare at the hem without too much bulk at the top. It seemed I was pretty much making it up as it went along with this dress, so I decided to do something similar at the hem:


This time the inner measurement of the frill was the exact measurement of the hem, without any gathering.

So here it is all together:


Here are some details:

I gathered the frill with a long machine stitch, then tried it on with the dress to adjust the size. The off the shoulder section had a piece of elastic applied with a 3-step zig-zag to keep it in place:

Elastic applied with 3-step zig-zag 
The rest of the gathering was stitched directly to the neckline:


I didn't line the bodice - I get really hot! - but I did line the skirt in this rose pink polyester, as well as the hem frill:


Despite having no need for this dress in my wardrobe, I did find a reason to wear it at a friends birthday party. Of course, I forgot to take any photos of it in action!


That's it for now - see you soon!

Wednesday, 30 March 2016

'Pass the Peas' Dress - A Vintage Pledge Mash-Up

Hello! I've just come back from adventures in Los Angeles and Hollywood, where besides visiting Disneyland, eating a lot of Japanese food, and drinking a lot of cocktails, I also managed to do some fabric shopping. For some reason, it didn't occur to me to visit Mood's Los Angeles outpost; instead, I was excited about seeing Islands Fabrics, which is a whole store devoted to Hawaiian and Tropical fabric!


Just a smidgen of what they have on offer!


I was very restrained and only bought one piece, which is the barkcloth-weight leaves in the picture below, bottom right: 


The rest was picked up in the surrounding shops, and there were so many more than expected:


Most of them are earmarked for shirts for Mr Needles, would you believe, but I managed to sneak in one more for myself, the little garden peas print cotton. It was sitting unloved on a pavement at the bargain price of only $2 per yard (had to go back to Imperial for this visit; metric never really did take off in the US), so I felt sorry for it and bought a couple of yards.

At first I saw it as a blouse - it seemed like too much pattern for a dress - but this beauty had been playing on my mind:


This was part of my prize from Vintage Pattern Pledge for 2015, run by Kerry at Kestrel Makes and Marie at a Stitching Odyssey. It seems apt to use the pattern won from 2015's pledge as part of 2016's pledge, so I went for it!

Just one hitch - buying without a specific project in mind had backfired, and 2 yards wasn't going to be enough to accommodate the flared skirt. Solution - use a straight skirt from another favourite pattern, Butterick 8571:


I've used this pattern twice before, once as illustrated here, and once just as the skirt here and it worked out fine both times.

I had planned to take some pretty photos in my garden, doing some gentle weeding or something, but the recent gales we experienced here in the UK have turned my neglected garden into a bit of a mess. But I carried on regardless - here's the new dress in action:


I don't think the change in skirt makes too much difference - it still looks 40'ish. besides the skirt, I also had to adapt the sleeves to a shorter length in order to fit them in. But I gave them a little scalloped detail just as a reference to the original ruched shape:


Inside of sleeve with facing
Speaking of sleeves, I decided to insert the sleeve before the side seams were attached, on the flat, as it were. This was much easier and less fiddly than the usual technique of closing the side and underarm seam first, and the sleeve head came out pretty smooth:


The neckline is the main feature on this dress, being made up of 2 draped and pleated panels which then attach at the centre front and are covered with a little tab:


Before attachment to the bodice...

...and after

I wasn't quite sure how to finish this seam so that it was neat and attractive, and the instructions give you no guidance. I finally decided to bind it with bias cut from the same fabric as the lining:


The hem was also finished with matching bias strips:


I rarely line a dress fully - I get too hot! - and this was no exception. I used a gold poly to line the skirt, which you can see at the kick pleat at the back:


And finally it all gets closed up with a zip at the centre back, which is again a necessary departure from the pattern which saved fabric. But I did stay old-school and put the zip in by hand, with a little hook and eye at the top:


And that's pretty much it. I'm off to learn how to drive this thing!


See you soon!