Showing posts with label peter pan collar. Show all posts

Wednesday, 10 April 2013

A-lines and Concrete - Simplicity 5096


I've mentioned before that I have to wear black for work.  To say it's boring is an understatement; most days you'll see me in my own personal uniform of black skirt, scoop neck top and cardigan. I have a few dresses that liven things up, but I admit that sometimes I feel a bit stuck in a rut when it comes to my work wear.

That's why I decided to make this little number, just to give my professional wardrobe a bit of a shot in the arm. It's a shape I don't usually wear, and from an era (the 1960's) that I don't usually sew from, but it felt good to have a bit of a departure from the norm.


This dress was really easy to make up - it went together so easily! I cut the seam allowances at the front 1" rather than the standard 5/8"/1.5cm, in case I needed to make any adjustments over the bust, but there was no need in the end - fitted beautifully! I also added a self drafted Peter Pan collar (see previous post) in black satin, just to make it a little more interesting.


I matched this to the bow at the front:


The main body of the dress was made out of a pretty standard poly-cotton twill. I added a contrast lining to the skirt of the dress in shocking pink - take that, work uniform rules!:

Pink polyester lining, and pink binding on the sleeve hems.
And in tribute to the patterns 1960's origins, Mr Needles and I spent an afternoon in the cold spring-time sunshine at the Barbican in East London, pretending we were David Bailey and Jean Shrimpton (or maybe more Eric Sykes and Hattie Jacques)


So there we were, wandering around what's apparently Europe's biggest performing arts venue, admiring what we thought was a fine example Brutalist architecture from about 1968:


The double 'M' was even mentioned - Mad Men. I love that show, but cringe involuntarily whenever I hear it used a shorthand for describing anything from the 1960's. It seems to be thrown about randomly, applied to anything from hip young fashions of the time, to little tweed suits worn by wealthy older women. What I love about the series is the distinctions the costume designers make between old and young, rich and poor, hip and un-hip. After all, not everyone was 'swinging' in the 60's; if anything, the majority were like Don Draper, leading pretty conservative lives, puzzled by the Beatles and all the rest. The series has manages to steer clear of all the cliches that you think the 60's were all about - white go-go boots, velvet suits, plastic moulded furniture and all the rest.


So imagine my embarrassment when I bothered to do some research into the Barbican's history, and realised ground wasn't even broken on the site until 1971! It was officially opened in 1982! I fell into the trap of thinking this was a typically 60's complex, all Corbusier-esque cities in the sky, and I was completely wrong!

To hell with architecture and all its confusing eras and ism's, I'm going to the bar:


 See you soon!

Wednesday, 13 March 2013

Drafting a Peter Pan Collar

The first thing I ever learnt to draft was a Peter Pan collar, back when I was doing A-level fashion and textiles (like high school, for the benefit of non-British readers). Its really easy, and I've never forgotten it. And now I'm passing it on to anyone who cares to read this post!

I can't take credit for most of this technique - most of it's borrowed from 'Make Your Own Dress Patterns' by Adele P Margolis , which I discovered as a teenager and thoroughly recommend to anyone who wants to alter patterns, or even start drafting from scratch. 


Besides the clear instructions, I love it mostly for the diagrams (I go nuts for a clear diagram!) and the brilliant fashion illustrations:


Anyway, on to drafting the collar. You can use this technique to apply a collar to an existing pattern. First, you have to determine if you'll need a 2-piece or 1 piece pattern. 2-pieces will be needed if your top is fastening at the back; seam allowance will have to be accounted for at the center back. A 1-piece will be used if your top is fastening at the front, or is on a neckline wide enough that you can just pull it over your head; in this case the center back is usually placed on a fold when cutting out.

A one piece collar which fastens at the front
The obvious approach would be to match the shoulder seams of your front and back bodice, trace the neck on to your paper, then draw the collar. But this is WRONG!

Shoulder seams matching - not a good start!
Drafting the collar this way would result in a collar that lies completely flat against the bodice. Ideally, you want to create a 'roll', where the collar stands up slightly from the garment. According to Ms Margolis, 'Aside from improving appearance, the roll has the additional merit of hiding the seam that joins collar to garment.'

A previous project, showing a peter pan collar with a roll at the neck
So how do you create this mysterious roll? Simply by matching up the shoulder seams and neck point as in the picture above, but then overlapping the shoulder seams by 1/2"/1 cm at the armhole edge. This will change the shape of the finished collar line, so that when you apply it to the bodice, the desired roll will magically appear.

Shoulder seams overlapping 1/2"/1 cm - this is necessary to create a 'roll' around the neck
 You can play with this roll - the more you overlap the shoulder seam, the more you flatten out the collar seam, and the higher the roll will sit on the neck. But 1/2"/1 cm will give you a standard roll.

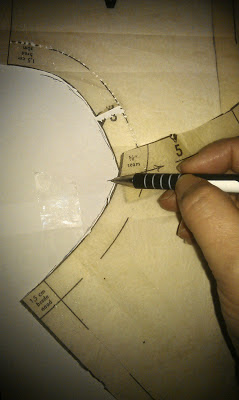
Next trace around the neckline, marking center front and back and neck point. 

Tracing around the neck seam
 Remove your original bodice patterns, then mark out the desired shape of your collar. I don't have a guide for this - I used a top with a collar I like as a guide, then drew this out with seam allowances added.


Marking out the final shape

The finished pattern, showing center front with curve, center back with seam allowance, and the point where the shoulder seam should sit
My version will be for a dress with a zip at the back, so I've added seam allowance at the center back.

Now it's down to cutting and sewing. Remember, if you are making a 2-piece collar that fastens at the back, you'll need to cut 4, ie 2 top pieces and 2 bottom pieces. For a 1 piece collar, you'll need to cut 2 pieces, ie 1 top and 1 bottom piece, usually with the center back placed on a fold.

This post is meant to be about drafting the pattern so I won't go into the detail of sewing the collar, which suffice to say is pretty straight forward. Here's the final result:

Finished front view

Finished back view

And there you have it! I hope this has helped anyone who wants to add a little extra to their outfits!