Thursday, 25 February 2016

Vintage Pledge 2016 - a Bit of Leopard

Hello! Once I read about the Vintage Pledge for 2016 on Marie's blog here, I knew I couldn't not get involved. After all, I have more than I know what to do with:


Just a few then...
I decided to start with McCall's 9722, which is a TNT for me. I love the simplicity of the design - it's just one piece and a waistband - and the draping at the waist is flattering and comfortable.


My old leopard skirt was looking the worse for wear, and since I consider leopard a wardrobe basic it was important it was replaced. I spotted this lovely stretch fabric at Fabworks Online:

The skirt fabric is the top right; I went a bit leopard crazy and got the pink jersey for a t-shirt
And here it is:


Picture taking coincided with wash day and my hair being up in a beehive, so Mr Needles decided it would be apt to go full-kitchen sink drama and take some photos while I pegged out the laundry.


The skirt is very easy to make, as it's just a center back seam with a zip and a waistband. I strayed from the vintage path and put in an invisible zip, where normally I would hand pick the zip on a piece like this. But they're still such a novelty to me I want any excuse to use them!


I shortened the length to just past the knee, rather than the vintage mid-calf. The pattern calls for the back vent to be sewn closed, making it in essence a pleat, but I turned it into a lapped split instead. 


And the whole lot was lined with some deep purple poly from my stash:


And that's really it! This is sure to be just the first of many vintage patterns I make up this year. 

See you soon!

Monday, 8 February 2016

Caped Capers!

I'm on a mission to reduce the mountain of fabric I currently have, though with each piece of stash used I inevitably have to buy more to supplement whatever it is I'm making, be it lining, contrast trim, and so on. Baby steps, I suppose.

In a bid to start, I dug out some lovely tartan wool from Abakhans, which I've had for at least 5 years:


I considered a skirt at first, but I really wanted a cape or jacket or something along those lines. This was partly inspired by the cape I made for Mr Needles  which I drafted myself. It was so easy, I decided to give it a go.

I started by making a muslin which looked like this:


This was just the basic cape shape, with no provision for arms or anything. I didn't really want this sort of thing, so after playing around for a bit I settled on the shape below, which is somewhere in between a jacket and a cape:


I made a few adjustments to the shoulder shape, the length, added a hood pattern and drafted facings, then started cutting out. I quickly realized that the fabric wasn't going to be heavy enough on its own, so I decided to interline it with some black cotton sheeting. In order to keep it in place while I was working with it, I tacked the cotton pieces to the outer fabric along the lines of the tartan, as you'll see below. The tacking was then removed once the pieces were all sewn together:

Wrong side of hood piece with interlining and tacking

Right side of hood piece with tacking

I did this with all the main pieces, before applying the interfacing which I attached by hand - forgot to take photos of this step, unfortunately! 

I like my projects, especially coats and jackets, to have weight to them; once I machined it all together, it still didn't feel quite weighty enough. I decided to abandon my original lining, a shiny poly, and considered other heavier options, like quilting. I couldn't find any I liked; then after a stroll along Walthamstow market I happened on some black fleece - problem solved!

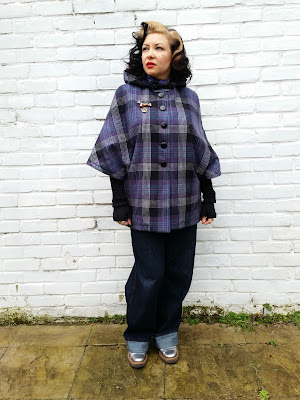
And here it is all finished up!:


I only had 2 metres of the tartan; if I'm honest, 2.5 or 3m would have been ideal to match all of the seams. But I just decided that some seams would match, some would 'half-match', and others wouldn't match at all. And you can always cut some bits on the bias and thus avoid matching altogether!

There's no back seam, so no matching needed there!


I made extra matchy efforts with the front:


And the hood, which was cut on the bias, got extra attention on the seam:


But the side seam got what I call 'half-matching' - I matched the horizontal lines, but not exactly to the right parts of the tartan - you'll see what I mean below:

Close up of the side seam - sort of matched...
But the shoulder seams - forget it! I've got better things to do:
Not really matched shoulders. Oh well...
Because I thought the front was looking a bit plain, I added a little tab at the last minute for some interest, and to pull the hood in around the neck:


Here's a picture of the linings and facings. The fleece was such a good choice - despite the big drafty sleeves, the jacket is really warm!:


One last thing - I love the simple silhouette of the jacket/cape, but it does have a rather limiting effect on the movement of your arms. Reaching up high for anything does mean the whole jacket lifts up with your arms; not a big problem, but for that reason I stopped the buttons at the waist:


And I think that's it. I leave you with a picture of me looking rather goofy with the hood up:


See you soon!


Outfit details:
Jacket - homemade, tartan wool from Abakhan, fleece lining from Walthamstow market
Shoes - Dries Van Noten
Gloves - knitted by me!
Brooches - Russian Dolls from Budapest, Spanish Galleon from charity shop

Friday, 15 January 2016

2 Skirts and a Cape - from Ikea?

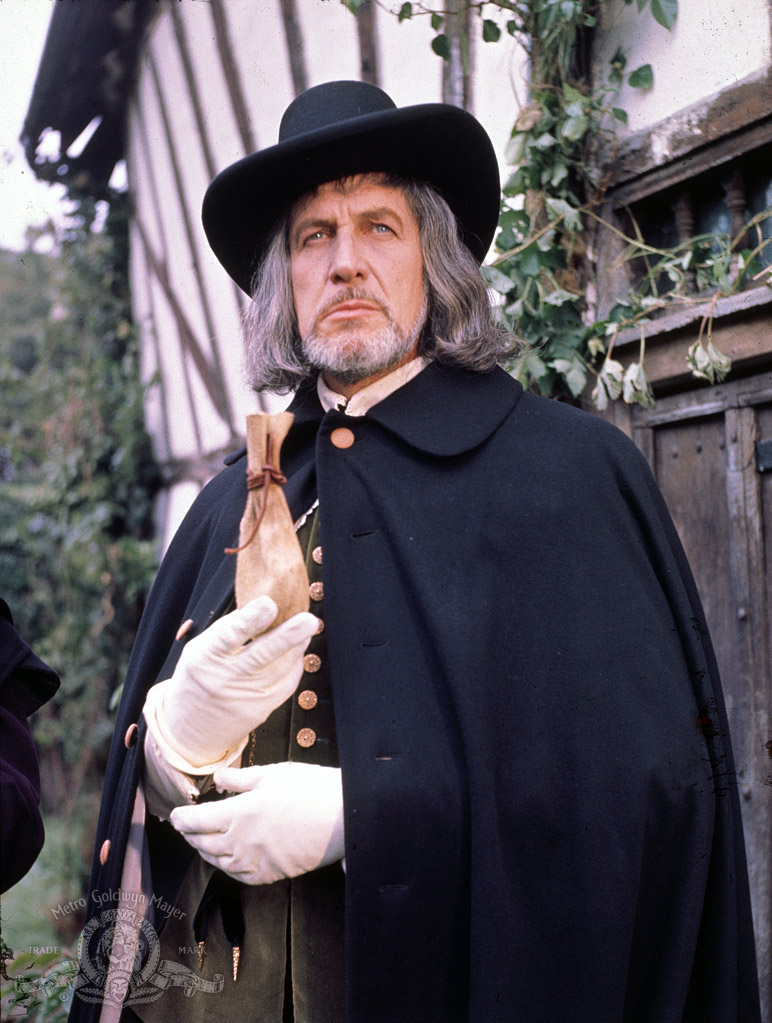
I'll warn you now - this is a bit of a rambling post, taking in everything from Ikea to Vincent Price, 80's Butterick to pattern matching, but stick with it - you might have some fun!

I've written before about how I usually end up overspending whenever I visit Ikea, and more often then not I end doing most of said overspending in the fabric section. This time I had a reason to be buying fabric, as Mr Needles was getting a long held Halloween request for a cape fulfilled. He's a big fan of horror movies, especially those from the 60's and 70's, and wanted to conjure up a Vincent Price look for Halloween - a combination of this:

Vincent Price in 'Masque of the Red Death'

and this:

Vincent Price in 'Witchfinder General'
I drafted my own pattern using the ever helpful (though at times a bit complicated) Natalie Bray - the cover (picture below) actually features the diagram for drafting a cape:


I used this pattern for the hood, which I lengthened to get the right amount of drapey, spookiness necessary:


I'm terrible at estimating fabric, and nearly always overbuy and this was no exception. He'd requested it be nearly floor length, so after playing around with the pattern pieces on the floor of the living room, I estimated about 4 metres would be enough. 

Pattern making in action - when only newspaper is big enough for your pattern pieces.

 Next stop Ikea, where I found  this plain red, medium weight fabric for only £4 per metre.

Lenda from Ikea


The cape was basically lots of long straight seams, and I wasn't going to bother with lining or anything, so it went together pretty quickly:

At the halfway stage

Hood fitting session with Mr Needles
And just to add a little touch of the baroque, I added this closure made of buttons from my stash:


Here's the finished product, on Halloween night:


I only really got these pictures - too busy having a good time!

So that was the cape. But what about the skirts mentioned in the title? Well, the overspending and over estimating on fabric came in handy, because I was able to get a couple of skirts for myself out of the leftovers and a sneaky remnant I bought at the time.

First, a pencil skirt using this 80's pattern:


I really liked the idea of the pockets - always handy! - and the button back closure. Here's how it looks:


The skirt seemed a little baggy at first, so I took it in a little through the side seams. Fits great, but the only concern is that now I have to be careful with any bending, as any extra strain on the buttons can be disastrous. I've already popped one, and sent it flying across the room! If I made it again, I might replace the buttons with a seam and zip.

Close up of button closure
And pockets are always a great addition:


So a piece from the remnant bin at Ikea also managed to come home with me - 1.5 metres of this over sized check:

Berta Ruta fabric from Ikea

I decided it would be perfect for the other skirt in this pattern, but without the back buttons, and the checks would make some really interesting lines:


Because of the limited amount of fabric, the back and front seams match, the sides not so perfectly, but you can't win 'em all!:


And again, pockets! - which I cut on the bias, so no need for any pattern matching:


I've worn both of these skirts at least once a week since I made them - they're just really handy to throw on with a t-shirt or sweater.

Hope that wasn't too long for everyone - see you soon!