Monday 16 May 2011

Beautiful Buttons Dress Update - How to roll a seam

B&W buttons dress - nearly done!
 
I didn't listen very much during my A-level textiles lessons - like most 16 -18 year olds, I thought I knew everything, and was really distracted by boys. But one thing I did take away with me was how to make seams roll, the sort of thing that's useful for collars, revers, pocket flaps, and anything else where you don't want the underside to show on the outside. It's a very easy and invaluable thing to learn, and I'm going to share it with you!

For this example, I'm using the collar on the dress I'm making to showcase my lovely Black and White face buttons (see Beautiful Buttons). This technique is used when you have 2 pieces the same shape, which you sew together right side facing, then turn right side out.

First - pin the 2 pieces together with the right sides facing, but make sure the layer which will ultimately be facing out - the top collar - is pinned about 1/8", or 3 mm away from the undercollar:

Top collar piece pinned 1/8" from under collar
This will mean that the top collar piece is slightly larger than the under piece. Don't worry! This is necessary - it will make the upper piece roll naturally to the underside. But it can be a little tricky to sew - you will encounter some 'fullness' as you stitch, but try to overcome this by stretching the pieces as you sew.

Second - stitch the seam, using the under piece as the guide for your seam allowance:

The top piece will appear a bit baggy, but it's ok!

Third - trim and clip the seam:


Usually just snipping the seam would be fine, but because of the sharp curve of this seam, I've put in as many notches a possible so that there is a nice smooth finish.


Fourth - Turn the pieces right side out and press. This is where the magic happens!

Underside of collar, showing rolled seam
See how the seam naturally rolls to the underside? This was achieved just by pinning the upper piece a bit further in from the edge; it makes the top piece 'baggier' than the under piece, so that when they are turned, the smaller under piece pulls the top piece under. This will give a much smoother, professional finish to your work.

I use this simple technique everywhere; not only does the edge of the piece look neater, but it will 'sit' better, ie not curl up.
Hope this helps. Happy sewing!

Saturday 14 May 2011

A Night Out With Churchill

Me, 'Fred' and Gabrielle
My sister and I recently had a jolly evening at the Churchill War Rooms, as part of the museum late nights event. It was the perfect occasion for the first outing of my newly completed red jumper. It's a 1960's pattern, but I thought it still went well with my nautical outfit, and I've never worried about mixing eras. 

 For the evening I wore:
Red jumper - knitted by me in Debbie Bliss Baby Cashmerino
'Blazer' nautical skirt - home made, fabric and buttons from Dalston Mill Fabrics
Navy suede handbag - charity shop, 75p
Beige slingback wedges - New Look, £35


Gabrielle and 'Fred'

Me and Chuchill's panda!


If you've never been to the Churchill Museum and War Rooms, I thoroughly recommend it. They've meticulously preserved the living quarters and map rooms, giving you an insight into the conditions under which momentous decisions were made. There are tiny kitchens, little bedrooms with cots, banks of big bakelite telephones (I liked the green ones for 'scrambling' messages), rooms covered in huge maps dotted with millions of pin holes, and so on.

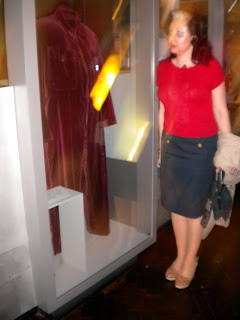
There is also the adjoining Churchill museum, which charts his life. Whatever your opinions of the man (and the museum is good at presenting him objectively), it's interesting to see the details of his life up close. I was particularly intrigued by this velvet jumpsuit :

 He had these made up in every colour, and would conduct all of his daily meetings in them; the look of horror on my face is me imagining my husband getting hold of this idea......

As for the jumper, this is the pattern I used:

I've always got several projects on the go at once, so I can jump back and forth when I'm bored. This jumper was so easy to knit - the back and front are the same - there is hardly any shaping, and the sleeve is knitted as part of the body. There's a lattice pattern worked vertically through the middle of each piece:
Detail of lattice panel
 I've mentioned before that I like knitting, but hate the blocking and sewing up, because the results are never exactly as I expect. For this jumper, I followed the blocking technique in 'Stitch and Bitch' by Debbie Stoller  which was really easy, as it just involved washing the finished piece, and then laying it out flat to dry:
Jumper drying during blocking stage
 I also used the instructions from the same book to make an i-cord for the flower detail at the neck. The result was this:

Which became this:

I finished it with a red button I had, and attached it to the neck with a press stud.

And this happened while I was trying to complete the jumper:
Bent needle!
I'd washed and set my hair, and was all set for an evening of knitting, drinking tea, and watching telly, when I sat on my needle, bending it totally out of shape. Luckily, I have loads more, as I can't pass a charity shop without buying all needles they have:
A selection of my needles   

Thursday 5 May 2011

Dress Sizes - Who Needs 'Em?


So I was hanging out with Paris Hilton, eating chocolate biscuits, when we started discussing the huge differences in vintage sewing patterns through the ages. Paris agreed with me that it's an interesting insight into the changing ideals of the feminine shape.

For example, take this pattern from my collection from the 1930's:


The difference of 5" between the bust and hips suggests a boyish figure was the ideal. The waist isn't even mentioned - I suppose it wasn't important!

Then, in the 40's, the waist appears, and the bust is larger with smaller hips:


In the 50's, we get more curvaceous:


The waist is a full 8" smaller than the bust - 2" smaller than the previous decade -  and the hip size is almost the same as the bust. Even though (according to studies) women's waists were naturally smaller in proportion to the rest of their bodies, it was totally accepted to wear girdles and other foundation wear on a daily basis. In fact, it was expected - there's a scene in 'Anatomy of a Murder', where Jimmy Stewart is trying to make Lee Remick a convincing, virginal witness, rather than the 'loose' woman she appears to be. The best way to achieve this? He tells her to 'wear a girdle, especially a girdle'. Enough said.

Then, the 1960's - the measurements are similar to the 50's, but the styles certainly aren't:


My mother was in her 20's in the 60's, and loved the liberation of fashion at this time. She wasn't a naturally curvaceous bombshell type, and suited the boyish fashions of the 60's. For her, it was a relief to not have to suppress her waist with a girdle, or to pad her bust, just to fit into clothes.

Today, on the rare occasion I buy clothes, I'm usually a UK 10-12, but then it depends on the designer/manufacturer. In the 1930's, I'm a size 18; in the 50's, a size 16; in both cases I would need to alter sections to make it fit comfortably. (If you really want to get into it, I'm a 42 in Italy, a 40 in France, and a 38 in Germany) These sizes really don't mean anything, yet through my work, I've seen first hand how women will walk away from a gorgeous outfit just because they don't want to wear a larger size. Why are we so hung up on numbers that seem to be chosen at random? Why can't we just refer to measurements, like they do in menswear and lingerie?

Anyway, I don't really have a point, other than just make sure your clothes fit you well, and who cares about numbers.

And what does Paris think? She would have an opinion, but she lost interest and is too busy trying to make the measuring tape into an accessory:

Wednesday 4 May 2011

Beautiful Buttons


Aren't they fabulous! Every time I visit Dalston Mill Fabrics, I look longingly at these buttons, and finally I've resolved to make something based around them. I've had this pattern for a while, and I think these buttons will be perfect for it:


I know it's summer, but I really fancy a chic black dress with some texture or pattern in the fabric. I think this fits the bill: a cotton-mix swirly, brocad-ey lightweight fabric. And I've chosen a turquoise fabric for a lining, just for a bit of fun!

I'm off to get started......

Monday 2 May 2011

Normal Service is Resumed

Sorry I've been away from blog-land, but there's been some rubbish to deal with at work that's been getting me down, but it's all sorted now, so you'll be seeing more of me!

The car blouse is done at long last. After my dilemmas about what to wear it with, and my complete rejection of Mr Needles' suggestion of purple, here I am wearing it with an old purple pencil skirt I made years ago, and it looks fine.
Caught off guard with a grumpy face.

The blouse was pretty straight forward to make; the only thing I altered were the sleeves, which I shortened, as the original had 3/4 sleeves which looked a bit too business-like for this fabric.

Button closure at back of neck

I also added a little car button at the back of the neck; the pattern recomended a boring old hook and eye, but I'm a sucker for cute buttons. I also added one at the left side, under the zip closure.


Button closure at hem

Hope you're enjoying the lovely weather, and see you soon!