I can't take credit for most of this technique - most of it's borrowed from 'Make Your Own Dress Patterns' by Adele P Margolis , which I discovered as a teenager and thoroughly recommend to anyone who wants to alter patterns, or even start drafting from scratch.
Besides the clear instructions, I love it mostly for the diagrams (I go nuts for a clear diagram!) and the brilliant fashion illustrations:
Anyway, on to drafting the collar. You can use this technique to apply a collar to an existing pattern. First, you have to determine if you'll need a 2-piece or 1 piece pattern. 2-pieces will be needed if your top is fastening at the back; seam allowance will have to be accounted for at the center back. A 1-piece will be used if your top is fastening at the front, or is on a neckline wide enough that you can just pull it over your head; in this case the center back is usually placed on a fold when cutting out.
 |
| A one piece collar which fastens at the front |
 |
| Shoulder seams matching - not a good start! |
Drafting the collar this way would result in a collar that lies completely flat against the bodice. Ideally, you want to create a 'roll', where the collar stands up slightly from the garment. According to Ms Margolis, 'Aside from improving appearance, the roll has the additional merit of hiding the seam that joins collar to garment.'
 |
| A previous project, showing a peter pan collar with a roll at the neck |
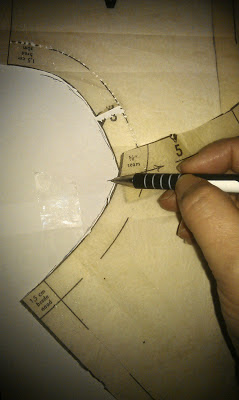
So how do you create this mysterious roll? Simply by matching up the shoulder seams and neck point as in the picture above, but then overlapping the shoulder seams by 1/2"/1 cm at the armhole edge. This will change the shape of the finished collar line, so that when you apply it to the bodice, the desired roll will magically appear.
 |
| Shoulder seams overlapping 1/2"/1 cm - this is necessary to create a 'roll' around the neck |
You can play with this roll - the more you overlap the shoulder seam, the more you flatten out the collar seam, and the higher the roll will sit on the neck. But 1/2"/1 cm will give you a standard roll.
Next trace around the neckline, marking center front and back and neck point.
 |
| Tracing around the neck seam |
Remove your original bodice patterns, then mark out the desired shape of your collar. I don't have a guide for this - I used a top with a collar I like as a guide, then drew this out with seam allowances added.
 |
| Marking out the final shape |
 |
| The finished pattern, showing center front with curve, center back with seam allowance, and the point where the shoulder seam should sit |
My version will be for a dress with a zip at the back, so I've added seam allowance at the center back.
Now it's down to cutting and sewing. Remember, if you are making a 2-piece collar that fastens at the back, you'll need to cut 4, ie 2 top pieces and 2 bottom pieces. For a 1 piece collar, you'll need to cut 2 pieces, ie 1 top and 1 bottom piece, usually with the center back placed on a fold.
This post is meant to be about drafting the pattern so I won't go into the detail of sewing the collar, which suffice to say is pretty straight forward. Here's the final result:
 |
| Finished front view |
 |
| Finished back view |
And there you have it! I hope this has helped anyone who wants to add a little extra to their outfits!


This is so amazing!! love love the peter pan collar!!
ReplyDeletexx
It's all Greek to me but I can see this would be pretty clear to anyone with the vaguest knowledge of what they're doing!
ReplyDeleteWandered over to your blog from WeSewRetro. To the untrained eye, I am just idling away time on a Sunday afternoon, but of course WE know this is valuable research. Anyway, brilliant tutorial on Peter Pan collars, which I love, so thanks, I will now be able to draft my own. Brilliant, thank you!
ReplyDeleteThis is brilliant - exactly what I am looking for - thank you!
ReplyDeleteAnd I've also ordered the book on your recommendation! Cheers x
thank you!!!!!! i have been looking for a simple way to draft a peter pan collar online and this has been the simplest one i have found. Thanks again!
ReplyDeleteGlad to be of help, ladies!
DeleteI used this and it worked out great! I also ordered that book, can't wait to get it :)
ReplyDeleteBest explanation about drafting....
ReplyDeleteThanks for this. I've always wondered how it rolls a little.
ReplyDeleteWonderful explanation! Thanks, huge Margolis fan here, too!
ReplyDeleteThis is such helpful information for anyone wanting to learn how to draft a Peter Pan collar.
ReplyDelete