Monday, 30 December 2013

Happy Holidays from Outer Space

At a recent Spoolettes event, the lovely Katherine of Yes, I like that blog-fame wore this outta-sight bowling shirt:


I fell head over heels in love with it, especially the fabric because it reminded me of these gorgeous Christopher Kane galaxy print dresses from a few seasons ago:


Christopher Kane, resort 2011
And even more amazing - Kathryn's shirt fabric was a duvet/sheet set from Tesco's (for non-uk readers, a popular chain of supermarkets). As soon as I got home, I scoured the Tesco direct website for this product, but they were sold out. This was probably because all us crafty bloggers have been buying them up to make gorgeous dresses, like this one and this one. Now I wanted it even more! Plus, I always make a new outfit for Christmas, and this was perfect for the upcoming festivities.

The internet came through, namely Ebay, where I scored a couple of single bed sized fitted sheets - I bought 2 just in case the pattern I had in mind wouldn't fit the fabric. I went through my patterns and eventually settled on the sleeveless bodice of this one:


- combined with the skirt of this one:


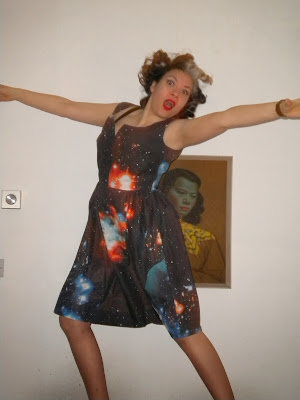
 And here's my finished piece, the Christmas in Outer Space dress:


 (I don't have any photoshop skillz, so jumping up and down on the bed was the best I could do in order to convey a feeling of weightlessness!)


I made some small adjustments to the patterns, namely adding about 1" to the waist measurement of the bodice. I also moved the back zip to the left side, as I wanted as few seams as possible disrupting that fantastic print:


As usual, I lined the skirt with a contrasting lining, this time orange because I felt it was in keeping with the solar flares in the print:


Close up of the neckline:


2nd prize winner!
You see me above at my annual works Christmas do. Imagine a large department store's-worth of staff out of their minds on booze, letting off a year's worth of pent-up frustrations, then double it - you'll get something close to how messy this event is. But a beautiful thing did come out of it - I won 2nd prize in the nights raffle! I didn't even know there was a raffle until the store director started announcing the winners.

And what did I get? £300 cold hard cash - brilliant! This was how I felt:


I sort of have a small idea what to do with it, but I may need some advice...

I think I might go all modern and invest in an overlocker! But which one to buy?  Being an overlocker novice, I need one that's relatively easy to use, but I want it to do as much as possible, and I don't want it to be too big, but not totally lightweight either. So... it has to be perfect, basically! Does anyone have any suggestions?I'd really appreciate any advice on what to look for.

Anyway, I hope everyone had a lovely Christmas and has lots of fun stuff planned to ring in the New Year!

See you soon!

Thursday, 12 December 2013

Minerva Bloggers Network - An Alternative Work Outfit

Time is flying - It's time for my second Minerva project, when it feels I only just finished the last one!

I've mentioned before that I have to wear black for work, which can be boring, to say the least. It's easy to fall into a rut of t-shirt, skirt, and cardigan. So every now and then I try to change it up with a different approach.

Enter Simplicity 1690 by Leanne Marshall:


Not being a watcher of 'Project Runway', I'd never heard of Leanne Marshall, but Google tells me she won season 5 of the show with a collection inspired by waves. The skirt caught my eye with its drapey panel on the front; for a moment I thought it could be a bit over the top for work, but hey - a day without dressing up is a day wasted!

I chose a medium weight polyester twill for the skirt, and a light weight crinkle satin (can't remember the fibre content...) for the top, and here's the result:


I really like this outfit and can't wait to wear it to work! The skirt is deceptively easy to make - it really only took about 3 evenings to make, and the top took an episode of 'Homeland' and the film 'Hannah' from cutting out to finishing up. Super quick! And the fabrics turned out to be perfect - the skirt is just the right weight (not too heavy, not too light; therefore it didn't need lining), and the satin has a peach-effect backing which feels lovely against the skin.


As usual, I did make a few adjustments:

- the instructions direct you to sew the zip in all the way to the top of the waistband, but I prefer a lapped zipper and a waistband that overlaps, which I then secured with a metal bar clasp:


- After copious measuring, I decided to cut the size 14, which should by rights be a bit small for me in the waist, but with ease, etc, it fits fine. I also lengthened the skirt by about 3"

That mysterious white smudge is on the lens, not the skirt!
- I used french seams to finish the insides of the skirt (click here for a how to), which makes for some bulky junctions in some areas, so I had to make sure they were trimmed down A LOT. It also meant that I couldn't gather the skirt with one run of machine stitching because it wouldn't pull through the seams and kept snapping, so I resorted to gathering it in sections. A little more time consuming, but a little less frustrating.


I'd definitely make this skirt and top again because it was so easy and so effective. And you can make it too if you head over to Minerva; they have kits for this project with everything you need, from fabrics and patterns right down to thread.

See you soon!

Friday, 29 November 2013

Strike! The Spoolettes Hit the Lanes

You may have spotted in a few other posts around the internet that a rather special group has started here in London - the Spoolettes! (Read about it here, or look at the Facebook page here) No real agenda, other than having fun and finding reasons to get together and wear special outfits we've made. 

And for our first big night out, we hit Bloomsbury Lanes for bowling, pizza, burgers, karaoke, and fabulous home made outfits!

Here's some highlights:

Kathryn of Yes, I like that in her shirt from outer space!

Emmie, Janene, and Jo in more gorgeous creations
Katrhyn, Clare (who organised the whole shebang), and me
Sally, the best bowler of the night, and just look at that embroidery
Rehanon, bringing extra sass!
Fiona, looking extra cute!
Who's the best dressed person in this picture? The Spoolette, of course!
Alison's perfect bowling stance!


And as usual, I was having too much of a good time to actually take any photos of my own outfit. I decided to go for a bowling-style dress, based on this pattern:


I used some red cotton drill from Dalston Mill, combined with some scraps of black poly and a few adjustments to the pattern to make this:


The main change I made was to the back, where I added a yoke and some pleat inserts, as well as some little tabs and gathers to pull in the waist a bit:


As well as this, I added black flaps to the pockets:


The most time consuming part was the back embroidery:


I drew the logo freehand onto my trusty roll of baking parchment (it took many attempts to get just right), then pinned that to the back of dress and embroidered through it:


Not being an expert on embroidery, I just made it up as I went along, I think the stitch I used is called a split stitch. Whatever it is, it worked! Here's some details:


That's meant to be a bobbin...
... and that's a needle
I also put my name on the front:


I'll leave you with a photo of Clare's vegetarian burger and her alcoholic shake, which was a delicious revelation:


See you soon!

Thursday, 14 November 2013

Minerva Bloggers Network - Ahoy There!

It's time for my first Minerva Bloggers' Network project - I present to you the Ahoy There! dress:


Otherwise known as Vogue 8728, from 1946:


I know it's freezing cold outside and that this is essentially a summer dress, but then I've never let things like temperature dictate what I wear. Besides, winter is exactly the time when we need bright colours around! 


I used a lovely cotton poly mix printed with polka dots and nautical rings on a red background. The fabric has a 'stiff' quality and at first I wasn't sure there would be enough drape to suit the 40's look of the design. You definitely need to pre-wash it before working with it to soften it up a bitBut after that it's a dream to work with - it hardly frays, irons beautifully, and doesn't crease at all. A dream fabric!


I didn't really think about how the gathered bodice was going to look over my bust, as I'm not wanting in that area. Would the boobs get all the attention? Ultimately, I don't think it looks too bad:

 The dress goes together really easily - the gathered bodice makes fitting pretty easy, and the skirt just gathers up and attaches to it. For reference, I cut the size 14/bust 36. I only made a few adjustments:

- the pattern instructions guide you to lay the waist yoke over the bodice and top stitch through all the layers. I preferred to encase the raw edges between 2 layers, so I cut 2 of the waist yoke and stitched the bodice between the 2 layers and then turned it right side out. I trimmed the seam allowance, then top stitched through all the layers.


Bodice yoke before being turned right side out

 
Yoke turned right side out and top stitched

- I didn't really want to make the belt - it just wasn't doing it for me. Instead I interfaced a strip 3" wide and the length of my waist measurement, stitched it and turned it right side out, then added a bow and used a hook and eye to close it:


It's a bit hard to see on the dress, but I assure you it's there!

- the pattern doesn't really give any indication of whether or not to use lining; I almost always add lining to a skirt and this dress was no exception. I stitched the 2 layers separately, then treated them as one when I gathered the skirt and attached it to the bodice. I also used off-cuts from the lining to make bias strips to finish the hem:

Detail of the lining and finished hem
- The hem is marked at 2", but that was too long, so I shortened the dress by 4" and shortened the lining by 5 1/2"

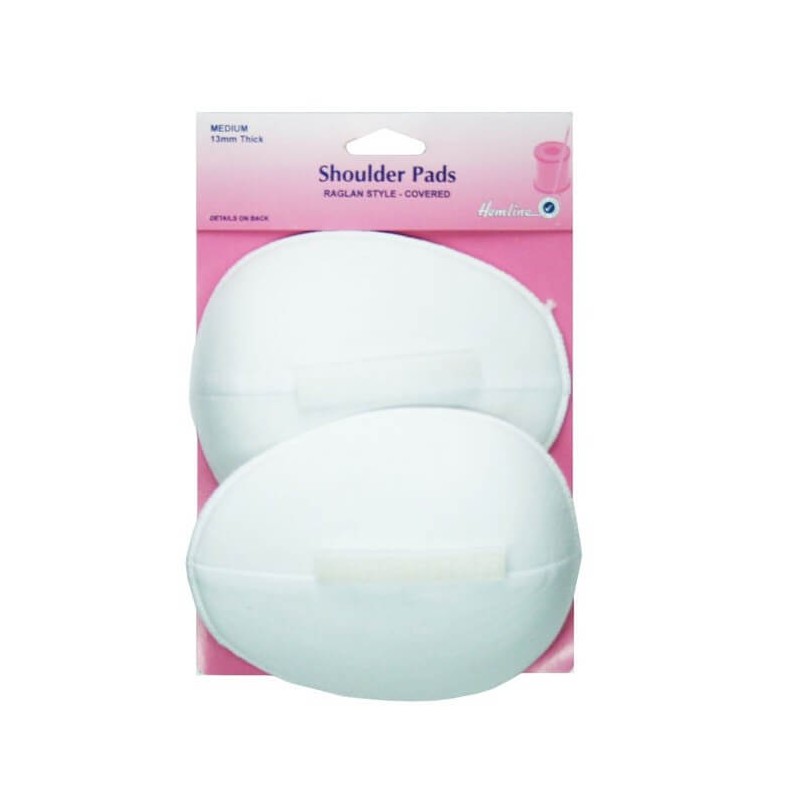
- I'm essentially quite a lazy seamstress and if I can save time I will. So when the pattern recommended you make your own shoulder pads, I decided instead to use these beauties:
They have a nifty little velcro strip along the top; I tacked the top strip to the shoulder seam then just stuck the shoulder pad in.

The only other recommendation I would make is to avoid hand stitching with this fabric - the texture is too crisp and the hem is huge, so just stick to machine stitching. And there's enough going on in the pattern that you don't see any stitching.

I really love wearing this dress, and was determined to get some shots of it by water. So I braved the cold November afternoon to pose by the Regents Canal:


Bemused dog walkers and cyclists wrapped in layers of winter clothes looked on while I pretended I was in some sort of summer location. The cold always makes me hungry so Mr Needles and myself headed over to The Advisory in Hackney afterwards and ordered a heap of burgers and fried food:


I managed to stuff most of this into my body while wearing this dress, so I can confirm you can eat copious amounts of food without any seams splitting!

And that's pretty much it! If you like what you see, head on over to the Minerva site where you can buy a kit with everything you'll need, even down to thread and zips.

See you soon!