Friday, 28 March 2014

Swingin' Darts! Or, How to Reduce Fullness From a Baggy Neckline

Unusually for me, I made a muslin for the bodice of my last project, Butterick 5747. 


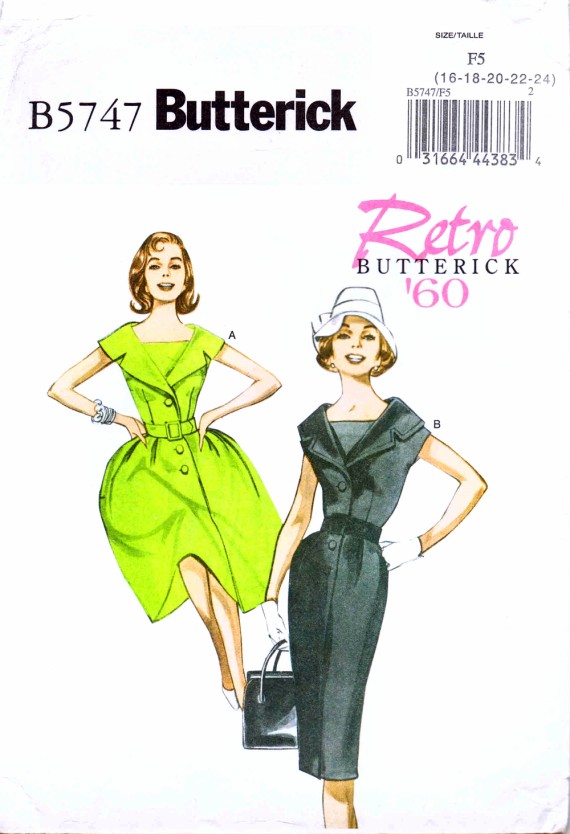
Butterick 5747 from 1960
Seeing that it was a fitted style, and knowing I'm a bit larger than average in the bust region, I wanted to make sure it would fit on the neckline and so I took the extra time and made a trial run in a light poly cotton similar in weight to my dress fabric.

I cut it out the size 14 without any adjustments and stitched it roughly together. And wouldn't you know it - major bagginess around the front neckline:


The waist was fine, the fit around the arms and at the back was good, but as you can see there was lots of floppy, baggy fabric along the 'decolletage', which wasn't going to look good on the finished piece. 

To me, the point of a muslin is to give you the opportunity to 'play around' with the look and fit, ultimately helping you decide if a style will work for you. With this challenge, I thought about moving the centre front, but ultimately I went with a dart. I pinched out the excess along the front and pinned it:


Success! All of the wobbly excess along the front was eliminated, and the shape of the neckline was still retained. For a little while, I considered leaving the darts in the final piece - after all, the wide collar would probably hide the darts. 

Then I decided I was just being lazy and decided to redraft the pattern. Here's the original pattern front, with the new neck dart added:


To get rid of the neck dart I decided to swing it round to the waist dart by closing the neck dart, then slashing open the waist dart to accommodate it, like this:


By closing the neck dart and slashing the waist dart through the middle to the point of the neck dart, the pattern falls open naturally to accommodate the excess, as seen below:


Then I redrafted the pattern with the adjustments, re-drawing the waist dart taking care not to take it all the way to the point of the neck dart or else I'd end up with pointy boobs!

Re-drafted front bodice

At first, the balance of the piece looked slightly 'off' - I decided to keep the centre front on the straight grain for stability, so the rest of the piece curves around quite dramatically. But would it work?

It did!

Sorry about the gratuitous boob shot...
Snug around the neckline, and still fits on the waist and bust.

And here's the finished outfit with the redrafted piece at work:


And that's that! I hope you find this technique useful if you're making this dress, or even if you have fit issues on other projects - the same principal can be used pretty much anywhere there's a dart.

And don't forget to enter the Pattern Pyramid competition that's running until Sunday the 30th - leave a comment here to join in the fun!

Saturday, 22 March 2014

The Pattern Pyramid - Next Stop East London!


Jo over at Sew Little Time was the recent recipient of the famed Pattern Pyramid. For those who aren't familiar with it, this is a rolling competition started by Karen at Did You Make That (read the original post here). To summarize, the winner of the pyramid takes a pattern (or 2, or 3...), then tops up the pyramid with new patterns, and holds a competition to send the pyramid on its way. So far, its been around Britain, to the USA and Australia and back, and now - guess what! - it's back in London!

I was the lucky winner of Jo's competition, and now I'm ready to send it on. The pyramid's grown from its original 5 or 6, now totaling a whopping 27! I helped myself to these 2 beauties:


And I've added these 4, from a range of eras:


Wanna get your hands on this mammoth haul? Here's what you've got to do:
  •  Just leave a comment below to enter. I'll pick one randomly and send out the patterns to the lucky winner.
  • You have to be a blogger with an active blog. You can be located anywhere in the world - we're international, baby!
  • Once you receive the pyramid, select a pattern or 2 to keep, then add a few to keep it fresh.
  • Then host your own giveaway and keep the goodness going!
The competition closes on the 30th of March (Midnight GMT). So get commenting and good luck!

See you soon!

Thursday, 13 March 2014

Minerva Bloggers Network - Retro Butterick 5747

Hello there! Well, spring is dropping little hints that it's on its way with the odd flash of sun so it's fitting that this latest Minerva project is a cotton dress with a nautical feel.

 I present Butterick 5747 from 1960:


Usually I assume with super-feminine, retro styles like this that wearing them will feel a bit 'binding' and uncomfortable compared to our modern cuts and stretch fabrics. But this dress is actually really lovely to wear - I want to find every excuse to wear it, so don't be surprised if you see me pottering around the supermarket in it!

The fabric is a lovely black crisp cotton sprinkled with off-white stars and dots. The style and fabric isn't obviously nautical, but I added some Russian braid to the collar to give it a sea-sidey feel:


Speaking of necklines, I'm particularly proud of getting this one to fit. I'm not a big one for making muslins - I feel like I'm wasting fabric - but this was worth it for the learning experience and the final result. I'll explain it in another post, but basically all I did was pinch a dart out of the neckline, making it lay extra flat. I closed that dart and then swung the excess into the waist dart. The pattern piece looked a bit odd - huge, massive waist dart - but the fit around the bust and neckline is just how I want it:


Since the neck is wide and on the bias, there's always the possibility it will stretch out. The best solution is to reinforce it with tape; I improvised by cutting strips from the selvedge of the fabric and sewing them in to the neck seam:

Improvised tape, sewn into the seam

I also altered the insert at the front - the original size sat right up on my collar bone; I lowered it by about 2".

I swear it normally sits flat - I don't know where that crease came from

The neck insert on its own - it attaches with buttons and press studs to the inside facing

A few other details:

The hem is finished with bias tape and machine stitched:


There's a lapped split at the back of the pencil skirt, and I finished this with an arrowhead at the top to keep it from splitting open:


 There's no zip in this dress, instead it opens and closes with buttons along the front. There's also a belt, which I'm not sure the dress really needs, but I added it anyway:


And here's a back view:


I think that's it! Remember, you can get everything you need to make this project - fabric, braid, buttons - from Minerva

I'm also making this part of Marie's Vintage Pattern Pledge, so look out for me on her Pinterest site!


See you soon!