Tuesday 31 July 2012

Do You Believe in UFO's?

Before I started blogging, I'd never heard of unfinished sewing projects as being referred to as 'UFO's'. It was then I realised I had enough floating around this house to populate a needlework version of Area 51! Joining up with Miss Katie's UFO and Stashbusting Project has really helped me have a structure to my projects, and I've actually cleared quite a bit of stuff, and saved some money to boot.

I recently had a good old clear out, and completed some bits and pieces, which I'll share with you now. In reverse order of age:

First, at 18 months - window seat cover:


I bought the fabric for this window seat with every intention of getting straight to it, but instead I just left the fabric in the bag next to the window seat for over a year. I'm ashamed to say I even started cleaning around it, like it was furniture! But a couple of weeks ago, I got up early on my day off, and completed it in a morning. I don't know what took me so long, because it was really easy! And now it looks so much better than the ugly old beige thing previously covering it. The lovely new cover makes the curtains look really sad, so that will have to be the next household project.

Next up, at approx 2 years, the gingham blouse:

 I found this half finished project in a bag amongst my fabric stash, and couldn't even remember what the plan was! There was no way I would have made the full blouse, as there wasn't enough fabric. I seem to remember having a Ginger Rogers, frilly 30' style in mind, so I messed around with the pieces and scraps, and came up with this:

Mr Needles says it makes me look like a rejected Stepford Wife.


There was very little fabric, so with the scraps I cut some frills on the bias, and gathered them to add along the button band and to make a little sleeve. The buttons were from a stall on the local market.

And finally, at 3+ years, the beaded scarf:


Close up of the bead work - it's a lot easier than it looks!
I used to have a long winter scarf that I knitted really quickly, and wore all the time. But I lost it somehow several years ago, and have been knitting this one ever since. Every winter for the last few years, I would watch TV and knit a few rows, thinking 'This year I might actually wear this scarf'. But it never happened, until a few weeks ago, when for some reason I decided to finish it, even though we're in summer. I think the reason it took so long was that the pattern was pretty boring to knit, and for some reason I decided to use 4-ply wool (a thinner wool, to you knitting novices), so it took a lot of work to actually add any length to the scarf.

Now I'll just have to wait for winter to wear it...

So now I'm UFO free! Next up - make a dent in my stash, which is threatening to get out of hand. But if you have unfinished projects, or bits of fabric sitting around waiting for you to do something with them, then do make sure you go over to Miss Katie's blog, for inspiration and motivation!

Also linking up with Lakota's Ta-Dah Tuesday - go check her out!

Monday 23 July 2012

Embrace the Bias!

I made this skirt to wear on a trip to Barcelona last year: 


It's a pretty straight forward style, but open it up to reveal:


All of the hems and facings are finished in a contrasting fabric. I always use a contrasting colour on the insides of my work, and extend this to the finishing of my hems. With the scraps of lining, I cut diagonal strips which are sewn on to skirt hems, sleeve hems, etc, to give a neat finish. This is when you have to embrace the bias!

So, what is bias? The 'true bias' of a fabric is 45 degrees to the selvedge (the woven edge of a fabric).

The tape measure is laid at 45 degrees - the 'true bias'


Due to the nature of woven fabric (which is made up of vertical and horizontal fibres) the diagonal has a natural stretch, as seen below:

Fabric stretched on the bias

This natural stretchi-ness means the fabric can mould around curves and any lines which aren't straight. It adds a slinkiness to outfits by clinging and draping around the body, and because of the bias, darts and seams can often be avoided. This was how the glamour of 1930's gowns was achieved:

Classic Jean Harlow - the bias cut clings around the hips and stomach without any darts, etc

Joan Crawford

Bias can also be used decoratively, especially with stripes:

Claudette Colbert in 'It Happened One Night' in bias cut blouse
I'm going to show you how to use bias in a slightly less glamorous, but very useful way - cutting bias binding (sometimes known as bias tape) to finish the insides of your garments. This will give your projects a neat and professional finish, and you'll never have to buy one of those little packets of bias binding ever again!

To be slightly less wasteful, I'm going to cut the strips on a diagonal, but not the 'true bias'. It won't matter, as there will still be a decent amount of stretch in the fabric:

Measuring tape on the diagonal of fabric

Next, cut the strips. I usually mark them out by making a chalk line, then measuring from this 4 cm or 1 1/2". Be careful not to stretch the fabric as you mark, otherwise the width won't be accurate.

Marking out diagonal strip

If you're cutting strips to face a hem, it's unlikely you'll be able to cut one strip for the whole hem. You'll need to join the strips at a diagonal in order to maintain the stretch.

2 pieces cut at an angle
Cut the 2 pieces to be joined at an angle (right sides up), then pin them together right sides facing and stitch:

Sttched together right sides facing

Wrong side, seam pressed open
Next, pin your binding to the section of you garment you want to finish, in this case the hem of a skirt. The binding is pinned right sides together to the hem and stitched:


Binding after being stitched

Then, iron the binding up and to the back of the hem:

Binding ironed up, away from the hem

Binding ironed to the back (wrong side) of the hem


Nearly done! Then I stitch thru all the layers, just under the binding.


Stitched just under the binding through all layers

Wrong side of finished binding

Finally, you can slip stitch through the binding to the body of the skirt, or top stitch, whichever you prefer.

This is my favourite way of finishing garments - it's neat and tidy, and it adds a bit of weight to a hem to help it hang better. 

Hope you all find this useful!

Monday 16 July 2012

Taking Le-Roy 5063 Out on the Town

Back in February, I bought some great fabric while on a trip to Manchester:

Rock n roll cotton!

I didn't really know exactly what I wanted to do with it until a few weeks ago, when I got a yearning for a shirt dress. This coincided with buying tickets to go see JD McPherson, who I've become mildly obsessed with (Mr Needles is probably sick of being updated on trivial McPherson facts, whch I do several times a day). The perfect outfit for a rock and roll gig!


I had a rummage through my patterns, and came up with this Le-Roy from the mid/late 60's:

I know it's not 50's, but I made it once before a long time ago, and seem to remember it fit really well; besides, I hate all those rules about eras and so on. Rules are made to be broken!

Here's the finished product:


I added a few touches of my own, just to break up the pattern a bit. I cut the upper collar from a contrasting black cotton:


 And I added little black cuffs to the sleeves:


To finish, I lined the skirt with a simple cotton, and hand sewed around the button placket:


And on the night - the dress was perfect for a hot and sweaty gig, and I'd love to show you evidence of this, but I was so busy having a good time that I forgot to get Mr Needles to take pictures of me in it! Instead, here are a few shots I managed to get of JD and the band:


JD, in a rare non-wailing moment

Jimmy Sutton
And to finish, a puzzling non-sewing incident witnessed by Mr Needles and I while on our way into the venue. There was a bit of confusion on our part, and we mistakenly joined the guest list line, behind this dapper gentleman:
Nick Lowe, former member of Rockpile, producer of Elvis Costello, the list goes on...

Who was the producer of this album:

The Damned's first album, containing 'New Rose', arguably the first British punk single
We heard him tell the young guy in the booth he was on the guest list. 

Booth guy asked him 'whose list?' 

Mr Lowe answered 'JD's'. 

Booth guy asked his name; of course, he replied 'Nick Lowe'. 

Mr Lowe waited patiently while the guy in the booth flicked through various sheets, looking for his name. Meanwhile, I felt like shouting out 'Don't you know who he is?' I was sure someone would recognise him and wave him through! 

Unbelievably, Booth guy came back with the answer 'Sorry, you're not on here' and Mr Lowe moved off to one side, looking dejected. I felt embarrassed for him... I hope he got in because it was a great night. 

I'll leave you with video proof he should have been let in - JD McPherson and Nick Lowe on stage together in Portland. Enjoy!


Monday 9 July 2012

Experiments in Colour - Simplicity 3266

If you're reading this from outside Britain, you may have heard that we're having the wettest summer since... well, who knows when, but I do know that it's really getting me down! I'm supposed to be having adventures, as explained in the title of this blog, but the unrelenting rain is keeping me indoors, making my hair frizz, and generally making life BORING.

A rare burst of sunshine...
To make things feel a bit cheerier, I made this blouse from a pattern from what looks like the late 50's or early 60's, Simplicity 3266.

I made version 3 (top right)
I'm not very confident with colour, and don't get much practice as I have to wear black to work, so I tend to stick to quite strong colours and easy combinations, such as red and black. But I'm always intrigued by some of the colour combinations and names you see in old knitting and dressmaking patterns, such as 'Eau de Nil', 'Chartreuse', 'Goldenrod', etc, so this mustardy colour was a bit of an experiment. And I think it worked - I thought it would give my skin a yellowy pallor, but it actually seems to brighten me up a bit. 

Here are some details:

I used some sparkly buttons from Dalston Mill Fabrics. Can't remember how much, but they would have been less than £1.00 total:


And here's a close up of the big collar, which is great because it gives the illusion you have a smaller waist:

Is it a collar, or a set of wings?
I've worn this blouse on over and over since I made it - it's rapidly becoming one of my favourite things! I'll definitely make it again in other colours, so I'm off to Google 'eau de nil', so I know what to look for in the fabric shop!

Thursday 5 July 2012

Jubilee Swapsies

Look what Mr Postman brought for me just the other day:


My Jubilee Swap parcel from the lovely Lucy at 1940's Style For You, as organised by Lakota at Faith Hope and Charity Shopping.

Lucy was so generous - inside were all of these shiny bits of loveliness:


Which revealed  a selection of homemade and thrifted items:

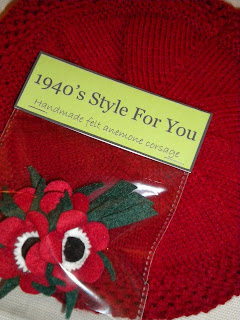
A knitted shrug pattern, a copy of Needlewoman and Needlecraft, 2 style patterns, some gummy sweets (quickly scoffed mostly by Mr Needles!), and a corsage, made by Lucy herself.

As well as this, Lucy included a red beret which she knitted, no doubt from a vintage pattern:

Close up of handmade felt corsage, and cute red beret
As usual, the British summer has proved to be mostly wet (I imagine the Olympic comittee must be praying to Aztec Sun Gods by now...), so the beret has aleady spent a day upon my head, and protected me well from the drizzle:

A big thank you, Lucy! I hope my parcel lives up to her standards. And make sure you stop by her blog, where you can see her beautiful vintage knitting, as well as her days out re-enacting WW2.